How to Use GitHub Pages for Parked Domains

For domain names I’ve reserved but haven’t done anything with yet, I like to have them parked with my own simple landing page rather than one of those ad-filled “parked domain” pages hosted by the registrar. Previously I had set mine up on a Digital Ocean VM. This wasn’t too difficult (and had a side benefit of forcing me to brush up on my Apache HTTP Server skills) but I’ve switched to a much easier method: hosting for free via GitHub Pages. This is not only free in terms of cost, but also time because it’s very simple to set up and run.
GitHub Pages
First of all this was a good excuse to finally learn more about GitHub pages and support for building static sites with Jekyll. In essence GitHub will automatically create and publish an HTML website from your repo source files. Both public and private repos are supported; GitHub will remind you that all generated sites are public though, so be careful if publishing private repos this way.
For anyone wanting to learn more, I suggest going through the Jekyll Quickstart first and then the specific notes for running Jekyll on GitHub Pages. After coming up to speed on the basics, I tried publishing things a few different ways and came to a few conclusions:
- Pages makes it very easy to publish automatically (no need for any separate deployment tools)
- You can use either full Jekyll, or fall back to writing your own HTML (which Jekyll which simply publish as-is)
- Troubleshooting Jekyll build issues is difficult if not impossible
- With an NPM module it’s possible to run the Pages build locally which is very helpful for debugging
- The GitHub documentation for Pages is pretty confusing
- Pages would be a great solution for anything simple, but not for anything more complex or critical
- SSL is included, and certificate renewals are automatic (thanks to Let’s Encrypt)
- Custom domains are also supported (no charge)
In the end I decided to go with a very plain HTML solution without anything Jekyll specific. Read on to see the steps I followed.
Setting up Parked Domains on GitHub Pages
These are the steps I followed for setting up my parked domain name pages on GitHub Pages. The example I’ll use here is my domain ifmodified.com.
- For your domain name (whether it’s new or existing), lower the DNS time to live (TTL) to be very short (an hour or less). If you had an existing TTL which was longer, you can do this step the day before to give it time to propagate.
- On GitHub, create a new public repo and choose the option to include a starter README. I’m using the domain name as the repo name, so my repo is at
bcantoni/ifmodified.com. - Note that private repos are also an option, but only if you’re on a paid GitHub account. In my case I’m on the free account level, but since the site is going to be public anyways, it seems to make sense for the repo to be public.
- On your local system, do a git clone to bring the repo down.
- Add your web content (even if just a simple index.html).
- Commit and push
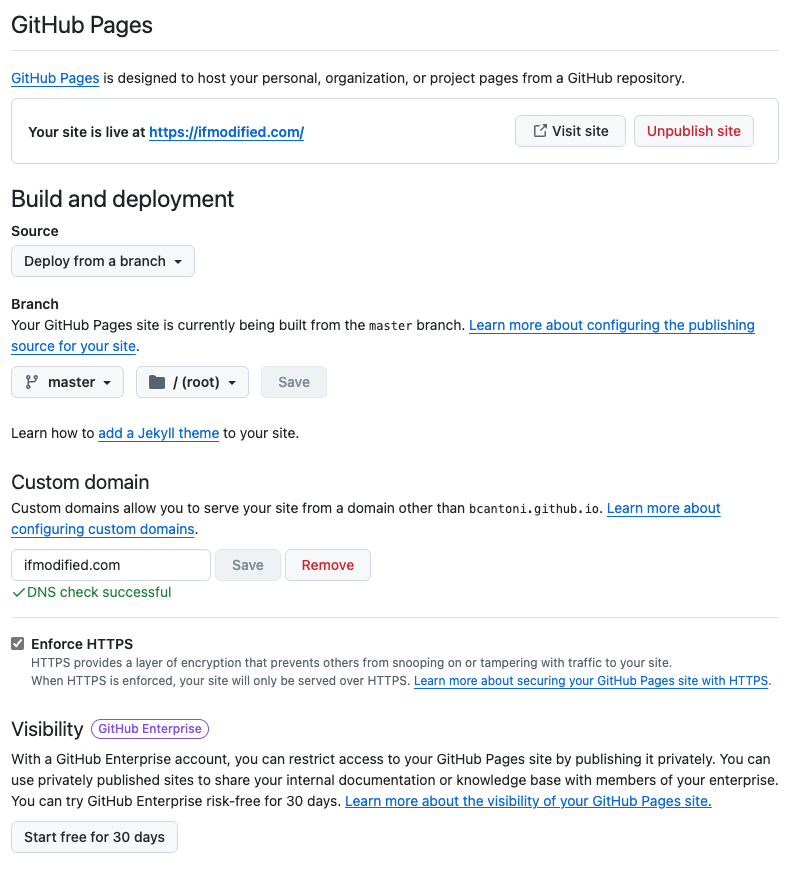
- On the GitHub repo settings, enable GitHub Pages and choose the option to publish from root of the
mainbranch. (Other options here include using the/docspath in the main branch, or the dedicatedgh-pagesbranch.) I also like to turn off wikis, issues and projects since none of those will be needed. - Your site should now be available on
youruserid.github.io/yourdomainname.com. - Next you’ll set up your custom domain by starting at your DNS provider. Add an A round-robin pool to include the 4 GitHub IP addresses: 185.199.108.153, 185.199.109.153, 185.199.110.153, 185.199.111.153.
- Wait a bit for this change to propagate, then check the DNS entry on your system with the command line
dig yourdomainname.com. If dig does not respond with the new expected IP addresses, wait and try again later. - Once the DNS lookup is working, return to the GitHub Pages settings and enter your domain as the custom domain name and save it.
- After a moment, GitHub should say your site is now available under yourdomainname.com.
- Finally you can enable Enforce HTTPS. After several minutes, this will be configured on the GitHub side and you can confirm by visiting your custom domain.
- If you have any trouble, remove and then re-add the custom domain name. That step will trigger the logic on the GitHub side to reconfigure everything.
- Once everything is confirmed working, return to your DNS provider and set a normal TTL once again (typically 24 hours or more).
- Whenever you need to make site content changes, just push them to GitHub and your results will automatically go live right away.
The UI might change around a bit over time, but as of this writing here’s what the GitHub Pages settings will look like when done:

Finally the results – these are my currently parked domains which are all using this technique:
For completeness, I also used the same method to hang a really simple landing page for Gorepoint (this one uses a minimal design built with Materialize.)
Photo credit: chuttersnap on Unsplash